 Photoshop tutorial making a cool glowing logo
1.start by creating a new project window. I always make it a bit larger then I need.now type in your prefered text.
4. When thats done, also add an outer glow with its default settings, pree ok, and move your text layer above your elliptical layer.
5. Make your text layer about 60% in Opacity.
6. We will now add a glass kind of effect to this logo. now make a selection so it covers half of your object, hold down shift and press backspace, fill with the color white.´

7. Hold down ctrl (control key) and press the layer with your elliptical object from before, and then hold down ctrl and shift at the same time while pressing i, this will invert your selection. now it delete.
8. Now set the opacity of your glass layer to about 60%
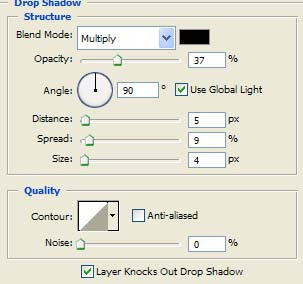
9. Go to the layers style for your glow layer and add values as in this image:

10. Here you see my image, I have been playing around with text and fonts and bend my text to fit the object.


6 comments:
Looks nice. :)
Click Here and vist our Sit: www.ParsPaint.com
i like your photoshop tutorials, nice ! i like it.
http://photoshopku.blogspot.com/
i like tutorials, would you like to join with me for partners?
Visit us for more info at: photoshop tutorials blog http://photoshopku.blogspot.com/
nice tutorial, i like it too dude...
A brilliant and resourcefully post
Post a Comment